Javascript is not enabled.

Javascript must be enabled to use this site. Please enable Javascript in your browser and try again.

Skip to content
Content starts here
CLOSE ×
Search
Leaving AARP.org Website

You are now leaving AARP.org and going to a website that is not operated by AARP. A different privacy policy and terms of service will apply.

How to Run Windows on Your Mac

It's a challenge, but installing Microsoft's rival operating system on your Apple computer can be done


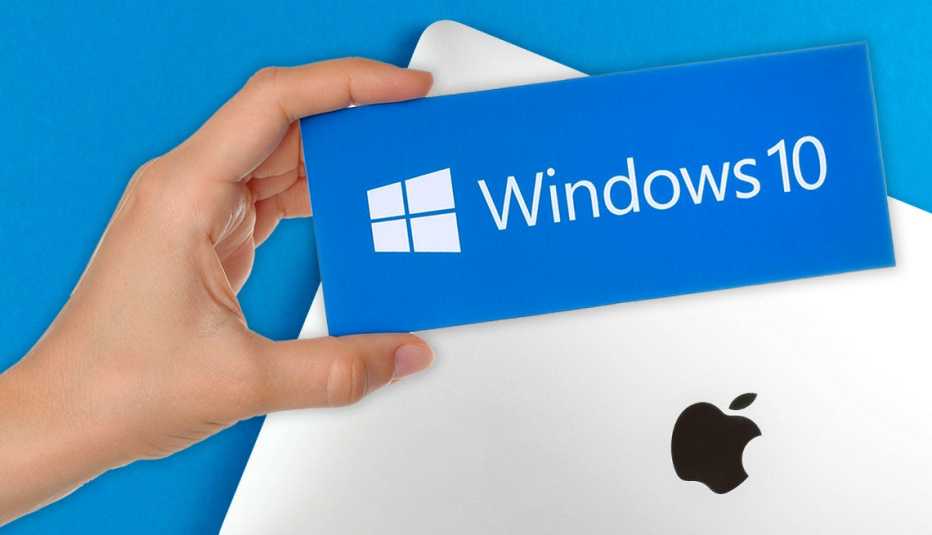
spinner image hand holding a box that says windows 10 with the microsoft logo above a macbook laptop
Getty/AARP

The long-running Macintosh-Windows rivalry is the Ali-Frazier battle of personal computers.

Microsoft’s camp crows about Windows’ market share dominance. Apple’s corner brags about the Mac’s popularity among the creative types and cool kids, reinforced in the late 2000s by Apple’s famous Mac Guy vs. PC Guy TV commercials.

Yet, while Microsoft recently pushed out Windows 11 and Apple released macOS Monterey, less enmity seems to surround PC-Mac clashes, perhaps because so much attention is focused on smartphones, where Apple is matched against the Google/Android folks.

Even if your PC is a Mac, you may still have occasion to employ Windows software, perhaps for work because Microsoft's Access relational database is available only for Windows, or to play a Windows-only game. Or maybe you prefer the Windows edition of a program such as Quicken personal finance software to the version produced for the Mac.

The good news is you can run the Windows operating system and thus Windows programs on your Mac. It's also possible to run the Mac operating system on a Windows machine, if you were curious. But because Windows runs on more than 3 in 5 laptop and desktop computers in the United States vs. a little more than 1 in 4 for macOS, according to Dublin-based Statcounter GlobalStats, chances are good that Windows users will find a Windows version of their favorite Mac applications that's easy to install.

The bad news for Mac users is that the options for running Windows are generally not for the technologically timid. Here are two main ways to turn your Mac into a Windows PC, at least some of the time.

How to use the free Boot Camp

Apple opened the window for Windows XP software back in 2006 when it introduced then-beta software called Boot Camp, which lets you run XP on Macs based on Intel chips. The Intel requirement remains to this day when the version of Windows you are likely to install on a Mac is Windows 10. That’s because Boot Camp, which is free, is incompatible with the freshest Macs based on Apple’s own M1 processors. For now, Windows 11 also doesn’t work with Boot Camp.

Consult Apple’s website if you’re not sure if your Mac’s compatible.

Keep in mind: It’s crucial to make sure you’re running the latest software on your Mac and have backed up your computer in case you encounter technical snags that could result in lost data.

You have several other important things to take note of with Boot Camp: You need at least 64 gigabytes (GB) of free storage on your Mac startup disk, though Apple recommends 128GB as a minimum for a better experience. Click the Apple icon at the upper left corner of the screen | About This Mac | Storage to check what you’ve got.

If you’re using an older Intel Mac, you will need a blank 16GB or larger USB 2 flash drive — again, check Apple's website to see if your Mac is considered old under this requirement. The drive must be formatted as MS-DOS (FAT). (You were warned this could get technical.) To do so, click the Finder icon at the bottom left corner of the dock | Applications | Utilities | Disk Utility.

Next, choose View | Show All Devices and select the USB drive in the sidebar. Click Erase in the toolbar and pick a name for the USB drive. From the Format pop-up menu choose MS-DOS (FAT) and from the Scheme pop-up menu, Master Boot Record. Click Erase.

Restart when changing operating systems

Boot Camp has a critical limitation: You can only boot up one operating system at a time, either the native macOS operating system or Windows. That means you must restart the Mac each time to switch operating systems.

You also need a full-installation 64-bit copy of Windows, not an upgrade, via disk or other installation media or through what’s known as a disk image or ISO file, which you can download from Microsoft. You’ll eventually need a Windows activation key license from Microsoft, generally $139 for Windows 10 Home software or $199 for Windows 10 Pro though you may find cheaper options elsewhere.

Make sure the Secure Boot setting on the Mac is set up for Full Security. That’s the default, so if you haven’t messed with this before you should be good to go.

If you’re using a notebook, plug it in to ensure you have power throughout the process. Then insert the formatted USB drive into the computer. Launch the Boot Camp utility by clicking the Finder icon (not Finder in the pulldown menu) | Applications | the Utilities folder | Boot Camp Assistant.

Click Continue on the introduction screen. The computer checks your disk space and clears out iCloud-cached files and old Time Machine backups to create space. Click Stop to skip this process.

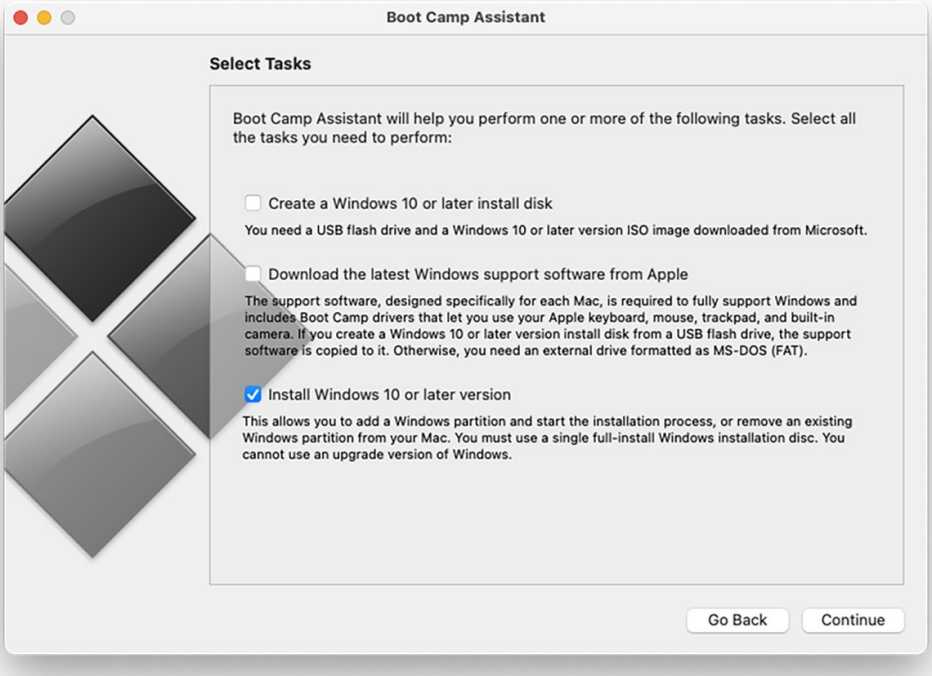
spinner image screenshot of the boot camp assistant dialog box called select tasks that shows three task options to choose from
Check the task or tasks that you need Boot Camp to help you with.
AARP

On the next Select Tasks screen, check off the appropriate box or boxes to Create a Windows 10 or later install disk, Download the latest Windows support software from Apple, and Install Windows 10 or later version. Click Continue.

Absent any hang-ups, you will be taken to a Create Bootable USB Drive for Windows Installation screen, where you are asked to choose the Windows ISO image and USB drive. Click Continue to copy the requisite files to the USB drive or Stop to interrupt the drill. All this can take a lot of time.

Next, choose your partition sizes, or the amount of space you’re devoting on the drive to Windows and the amount for macOS. Drag the divider between the Mac and Windows partitions and when satisfied click Install. As you choose, carefully consider the demands and programs you expect to put on each operating system, because you cannot change the partition size later.

From here you’re brought to a Windows installer. Choose the BOOTCAMP partition when asked where to install Windows. Apple warns you not to create or delete a partition that can wipe out the contents of your macOS partition.

Follow the onscreen Windows instructions to complete the installation in Windows. You’re asked to enter a valid Windows activation product key, which you may have received via email after purchasing a digital copy of Windows. You’ll need to restart the computer.

Even after you install Windows, you have to install Apple’s Boot Camp drivers to ensure the hardware works properly. Follow the onscreen prompts, click Finish and click Yes to restart the Mac again.

How to jump from macOS to Windows, vice versa

As noted, you can only run one operating system at a time using Boot Camp. You have a few ways to switch from one to the other. You can hold down the Option key on your keyboard when you start up your computer, then select whether to boot up in the Windows or macOS partition.

From within the macOS environment, you can also open System Preferences by clicking on the Apple menu at the upper left corner of the screen and then clicking on Startup Disk, an option not available unless you've partitioned your hard drive. Click the lock icon in the window and enter the computer’s password to make changes. Then click the operating system you want to start with on your next reboot, which you can initiate by clicking Restart.

If you’re already working in Windows and want to retreat to macOS, go to the system tray on the bottom right of the Windows screen, click the upward arrow symbol, then the gray diamond shaped Boot Camp icon. Right-click on the icon, and from the menu click Restart in macOS.

The above installation procedures are mostly similar if you are installing Windows using Boot Camp on a newer Intel-based Mac. The streamlined process doesn’t require the USB flash drive. Either way, you may still need to tinker with Windows settings, for instance, to set up your printer.

Parallels Desktop creates ‘virtual machine’

Parallels Desktop from Corel lets you add Windows to the Mac by creating what’s known as a virtual machine. It shares the Mac’s resources, but otherwise operates like a standalone computer.

This method has several advantages over Boot Camp. For starters, you can run multiple operating systems on the Mac at the same time, not only Windows but flavors of Linux and Unix as well, for example.

Second, you won’t have to reboot to switch from Mac to Windows or vice versa. In fact, you have the option to conveniently run Windows programs within the macOS environment through a feature called Coherence Mode.

Moreover, the latest version, Parallels Desktop 17, works with both Intel and M1-based Macs. It is compatible with Windows 11, too.

Parallels is not free

The downside: Unlike Boot Camp, Parallels isn’t free. A standard Home & Student Parallels Desktop edition starts at $79.99 a year; separate Pro and Business Editions with advanced features each cost $99.99 for the first year, roughly half to renew the next year. You can try the software free for 14 days.

Your computer should have at least 4GB of RAM, and at least 16GB for the installation of Windows 10.

You can download and purchase Parallels software directly from the company’s website. If you’ve done so, double-click the Parallels disk image file, which likely landed in your Downloads folder, to install Parallels. If you purchased a boxed version, use the USB thumb drive or disc to install Parallels.

Follow the prompts on the screen to create and activate your Parallels account, then launch the program from the Applications folder in Finder.

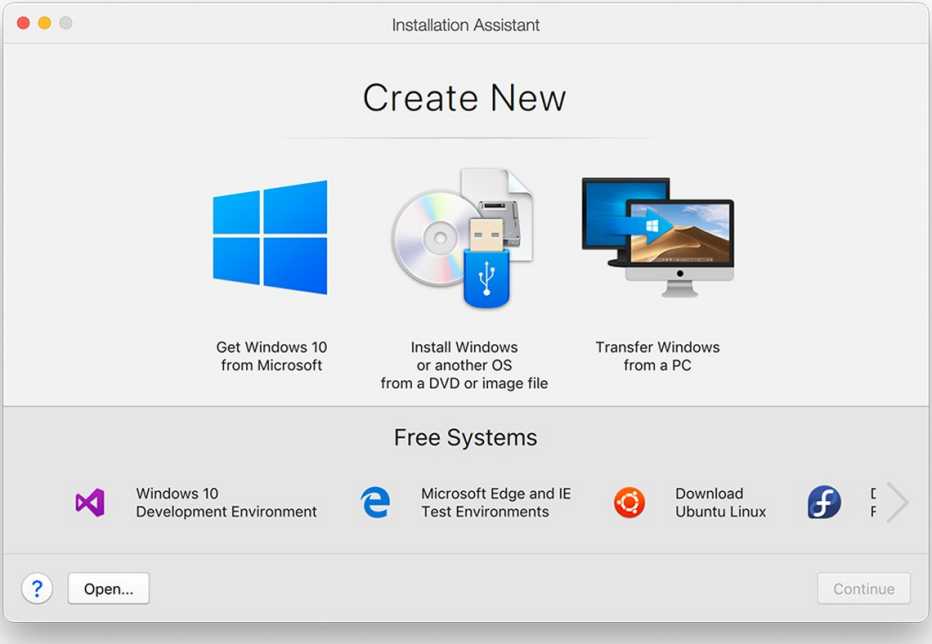
spinner image parallels coherence dialog box called installation assistant showing installation options
There are several ways to bring in Parallels after you’ve downloaded it from the company’s website.
AARP

You have a several ways to bring in Windows. Choose File and then New. You’re presented options to Get Windows 10 from Microsoft, Install Windows or another OS from a DVD or image file or Transfer Windows from a PC.

Choose the middle option of the three above if have a Windows ISO file (a file that is a copy of a CD or DVD) or Windows installation software on DVD or USB drive. Click Continue from the Installation Assistant screen that appears. You can click Choose Manually to select a DVD, Image File or USB Drive, or choose Find Automatically to let Parallels find the file.

When prompted, enter the Windows License Key or click links to buy it from the online Microsoft Store. In another step, you get to decide where you want to store Windows from the Save to menu, which by default is put in the /Users/Parallels folder.
Set the memory Windows can use

You can determine how much memory Windows will be able to use or whether Windows starts automatically when you open Parallels Desktop through customized settings before or after installation. Click Create to complete the installation of Windows.

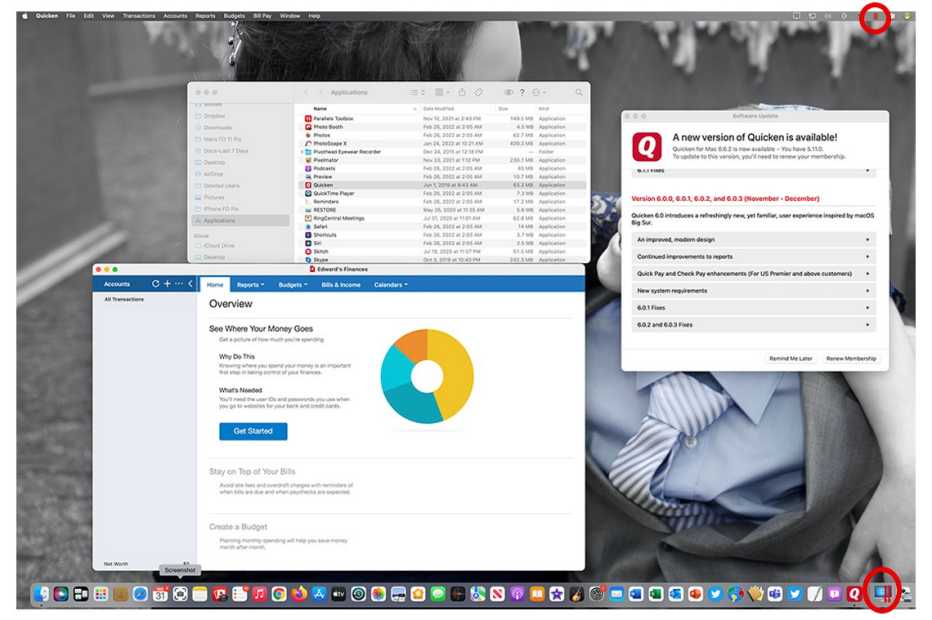
Once onboard, you’ll see a Parallels Desktop symbol, denoted by two parallel red, vertical lines, in the Mac menu bar and on top of any Windows applications you run on the Mac. You can click the Parallels symbol in the menu bar to access a Windows 10 configuration Control Center, to control memory, graphics, shared printers and more.

You can open Windows programs by clicking the Windows Applications folder in the Mac dock or by finding them in the Windows Start menu, in Finder or on the dock. You can also use the Mac’s Spotlight search feature.

spinner image parallels confluence running on a mac desktop with the active icons circled
You’ll know you’re in the Parallels desktop by the symbol, two red parallel vertical lines, in the Mac menu bar or on top of any Windows applications you run on the Mac.
AARP

Coherence Mode: Icons, Windows live side by side

If you run Windows full screen, your Mac will resemble any other Windows PC. But you may prefer Coherence Mode where Windows and Mac icons live side by side. The easiest way to start Coherence mode is to click the small blue gumball button in the top left corner of a virtual machine window, adjacent to the red, yellow and green buttons familiar to Mac users.

Alternatively, click on View from a Windows 10 menu in the Mac menu bar, and click Enter Coherence. Or go with a third option and press Control-Command-C.

The beauty of all of this: When it comes to Windows or the Mac, you no longer are forced to choose sides.

Unlock Access to AARP Members Edition

Join AARP to Continue

Already a Member?